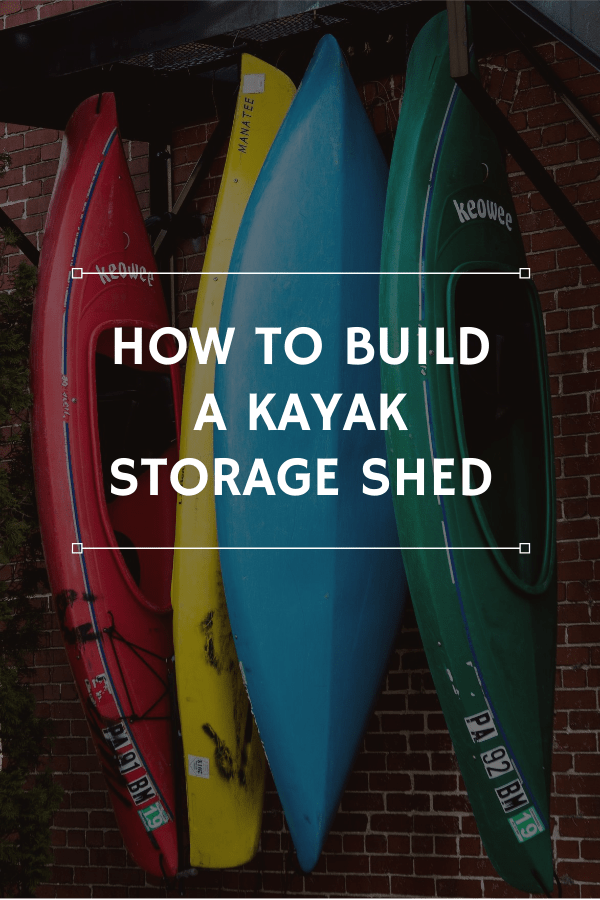
Most kayaks are built to last at least ten years. They’re durable watercraft that can withstand the elements if stored outside. But you’re going to increase the lifespan of your kayak by storing it inside.
Of course, not everyone has the space in their garage or house for indoor kayak storage.
But even an open-air storage shed that provides your kayaks with a covered area when not in use can significantly reduce wear and tear from weather.
You can take the route of purchasing a pre-made shed to store your kayaks or you can investigate building a shed of your own design. In most cases, you’ll be able to build a kayak storage shed at a lower cost than purchasing a prefabricated shed.
You can go with a simple design and keep the cost of materials down by keeping the shed more open. But there are still very important steps that you can’t forget when you’re investigating how to build a kayak storage shed.
In this article, we’ll outline more benefits of covered kayak storage and offer tips on storage shed design and layout, choosing construction materials, setting a strong foundation for your storage shed, and much more!
Benefits Of Covered Kayak Storage

As you gain experience as a kayaker, you’ll probably begin to make larger investments in your kayaks. Here are several important benefits of keeping your kayaks stored in a covered shed so that you can protect those investments.
Gets Your ”˜Yak Out Of The Sunlight
Exposure to ultraviolet radiation from sunlight will degrade your kayak. This is true regardless of the materials used in your kayak’s construction, including fiberglass, plastic, and coated fabrics.
Putting your kayak in a covered storage shed gets it out of the sunlight for a larger portion of its lifespan. Even getting your kayak out of the sun for a few hours every day can have a profound impact when those hours add up over the course of your kayak’s lifetime.
Reduces Exposure To Moisture
This one might seem a bit counterintuitive because kayaks are meant to spend most of their time in the water after all. But excessive exposure to moisture when your kayaks are in storage can cause the bottom of the kayak to degrade over time.
While this process is somewhat inevitable over the (hopefully!) long lifespan of your kayak, you can significantly reduce this degradation process of keeping your kayak in a covered storage shed when it’s not in use.
Keeps Your Kayak From Experiencing Temperature ”˜Extremes’
If your kayak storage shed is just an open-air space with a roof over it, your kayaks will still experience the effects of temperature shifts. But even the effect of having your kayaks stored in the shade will reduce your kayak’s exposure to extreme temperatures.
In the worst cases, excess cold can cause your boat to crack. Much like freeze and thaw cycles create cracks in even the strongest of granite rocks, your kayak will crack if it undergoes these extreme cold cycles.
Really hot temperatures actually have a higher potential to damage your kayak. Exposure to excessive heat can cause the bottom of your kayak to become deformed and, in extreme cases, the buildup of excess heat inside your kayak can lead to cracks.
Storage Shed Design And Layout
Before you begin construction, you must come up with the design and layout for your storage shed. In this section, we’ll offer a few important points to consider as you design your kayak storage shed.
Available Space
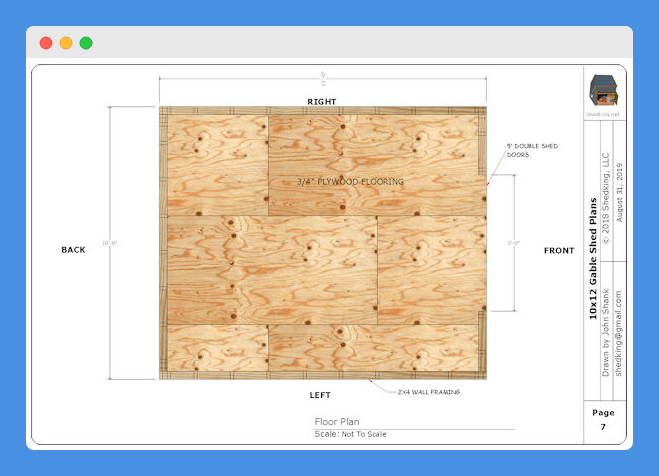
Most shed designs need to fit within certain dimensions. So the first major consideration as you’re outlining the design of your shed is how much space you have to work with.
Not only will the shed need to fit in the designated space in your yard or on the side of your house, but you’ll also need plenty of room to work around it. Keep in mind that you’ll need ample space to load/unload your kayak(s) into your shed once it’s finished.
A good rule of thumb is to allow at least three feet on all sides of your shed’s footprint. Choosing a location that’s as close to level as possible will also make your life easier when setting your shed’s foundation.
An additional consideration when it comes to available space for the footprint of your shed is whether you plan to keep everything above ground or sink footers for the foundation.
If you plan on the latter, you’ll need to have ample space to dig footers around any tree roots that may be in the desired area for your shed.
When choosing the location of your shed, it’s good practice to mark the location before starting construction. Use stakes and connect them with string to mark the dimensions of your eventual shed.
This will also give you a great visual on the total space that your shed will inhabit. Getting a visual at this stage is really important in case you need to go back to the drawing board with your initial design.
Doing this marking exercise will also help you make sure your shed is square. And there’s a few easy measurements you can do to make sure this is the case.
Start by measuring three feet along one side of your shed and four feet along the other side. Mark those points and then measure the diagonal distance between the points.
The distance between those points should be five feet. If that diagonal distance is more or less than five feet, you’ll know you need to make a minor adjustment to make sure your shed is square.

Number Of Kayaks
It might be obvious, but you’ll also need to design the layout of your shed so that it can fit all of your kayaks. Even if you only have one kayak right now, you might consider building a larger shed so that it can accommodate items that you add to your arsenal in the future.
In thinking about this element of your shed design, you should also consider how you plan to store your kayak(s). Storing them vertically one above the other will only really work for two or a maximum of three kayaks.
If you don’t want to lift your kayaks every time you take them in and out of the storage shed, you should consider side-by-side storage. And if this is your preferred method, your shed layout must be wider than if you prefer a vertical approach.
Storage Method
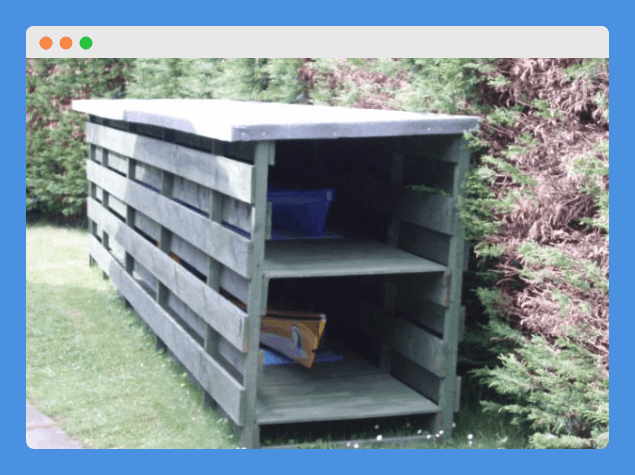
The next consideration is how you prefer to store your kayaks. Because your shed is going to be covered, you’ll have the freedom to store your kayak right side up, which isn’t an option with uncovered storage.
The freedom to store kayaks right side up allows you to use a similar design to most boat trailers. With this design, you’ll be able to slide your kayaks in and out of the shed with ease.
But you might also want to mount racks on the walls of your shed for kayak storage if your shed is designed for more than just kayak storage. Kayaks can also be stored on their sides or with the bottom up.
Your preferred method for storing your kayak will have a large impact on the design of your shed. So be sure that your design makes it easy to load and unload your kayaks according to your preferred storage method.
Environmental Considerations

As you work your way up to designing the roof of your storage shed, it’s time to start thinking about the weather in your area. The amount of rain and/or snow that you receive throughout the year will impact the roof design of your shed.
If you get a lot of snow in the winter, you’ll want to design a sloped roof that naturally sheds the snow on its own. And if this is the case, you’ll also need to consider where that snow is going to accumulate when it slides off the roof.
If you live in a relatively dry climate, you’ll probably get away with a flatter roof design. But you should still keep in mind that other materials can accumulate on the roof of your shed throughout the year.
When designing a shed for very wet and rainy climates, it’s very important to consider how water will run around your shed (rather than into it!). Extending the roof at least 12 inches outside the foundation dimensions of your shed is a good practice to keep your shed’s contents dry.
But you’ll also need to consider drainage around your shed as your finalize construction. This will help you avoid a puddle of standing water in or around your shed that can have a negative impact on your kayaks and the longevity of the shed itself.
Choosing Materials
Once you have your preliminary design in place, it’s time to start considering the materials for your shed. The most common materials for a DIY kayak storage shed is, of course, wood.
But before you decide on materials, be sure to check into local regulations, zoning laws, and any specific requirements of your homeowner’s association. There’s nothing worse than having your local governing body insist that you take your shed down after it’s built.
Once you check into building codes in your area, you should also consider which materials will be best for your climate. You’ll most likely use wood for the load-bearing structure, but you might elect to use a different finishing material.
A good pointer when selecting the lumber for the frame of your shed is to choose pressure-treated wood. This type of lumber generally lasts longer and is more resistant to water and insect damage than non-treated lumber.
Finishing your shed with wood, however, allows you to paint the exterior to match the surrounding environment. You can choose the same color as your house or fence so that the shed doesn’t look out of place in your yard.
You might also finish the shed with plastic, resin, or metal siding. These options are very resistant to weather and also more durable against rust, mold, and insect damage.
Another benefit of plastic, resin, metal, or even stainless steel siding for your storage shed is that you won’t have to add an extra coat of paint or stain once construction is finished.
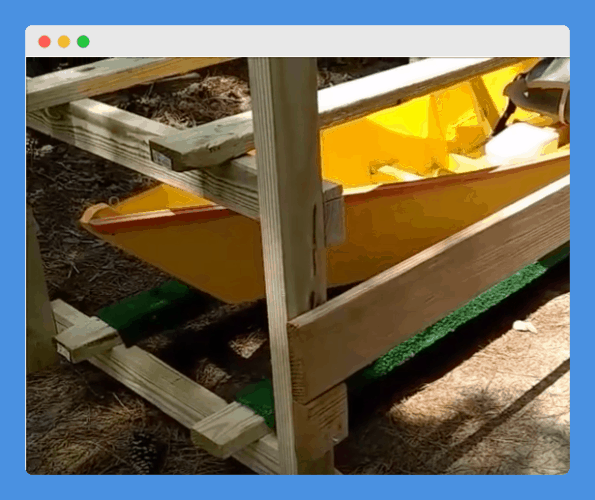
As a final touch, you’ll probably want to add some form of padding to the racks that your kayaks are stored on. Many folks opt for foam, but a more affordable alternative is to buy a square of outdoor carpet or turf and cut it down to your desired dimensions.
Setting The Foundation
Your storage shed is only going to be as durable as the foundation you create. So let’s look at a few recommendations for setting a solid shed foundation.
”˜On-Grade’ Versus ”˜Frost-Proof’
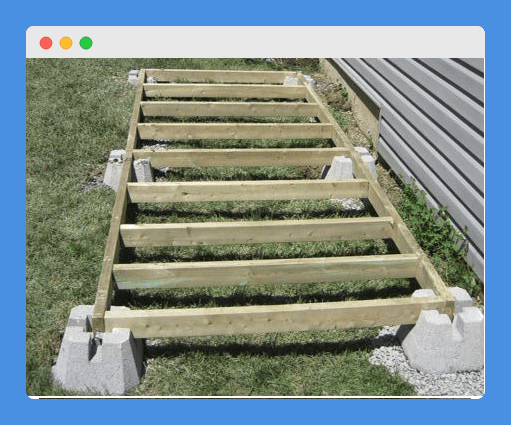
These are the two main types of foundations. On-grade foundations are generally sufficient for all but the largest buildings and are also the easiest to build.
The benefit of building an on-grade foundation is that you won’t have to dig deep holes to set concrete footings or piers. On-grade foundations are typically made of solid concrete blocks or pressure-treated lumber.
Frost-proof foundations are best for sheds that will be in cold-weather places where ground movement can impact the strength of the foundation. In general, a frost-proof foundation will be stronger and last longer than a foundation built on-grade.
With a frost-proof foundation, the footers must be set below the frost line so that they’re less likely to shift when ground temperatures dip below freezing. A good rule of thumb for this method is to dig holes to a depth of at least 12 inches below the frost line.
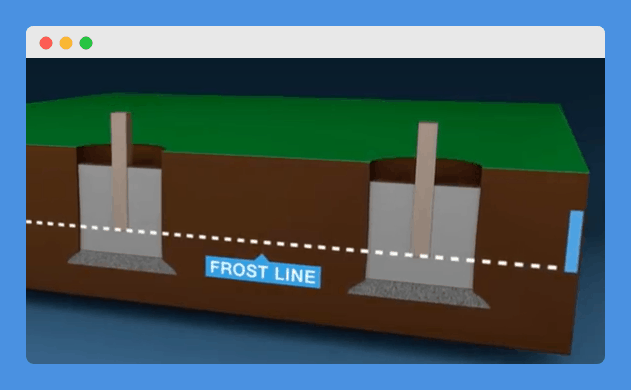
If you’re wondering how to determine how deep the frost line is in your area, this map provides a nice visual for general frost line depths throughout the United States.
There are three factors you should consider when choosing whether to build an on-grade or frost-proof foundation. Those factors are the size, location, and exact floor plan of your shed.
An on-grade foundation is generally sufficient for smaller sheds in mild climates. As your floor plan grows, however, you should start considering the long-term benefits of a frost-proof foundation.
Additionally, building your shed in an area that experiences consistent freezing temperatures requires a frost-proof foundation. Locations with excessive rainfall will also necessitate a more rigid, below-grade foundation.
Keeping Your Foundation Level
When setting the foundation for your shed, keeping everything level and aligned can be a big challenge. If you’re using concrete blocks for your foundation, make sure to set the first and last blocks in a row before setting any central blocks.
You can use a taut line to make sure the blocks are aligned. Leave the string in place while you align any blocks in the row before moving on to the next side of the foundation.
When it comes to keeping your blocks level, pros will always start at the highest spot and work toward the lowest. You can utilize a two-by-four to help ensure that your blocks are level before you start building up.
Framing Your Shed
Once you have your foundation in place, it’s time to start framing your shed in. If it’s a larger shed, you might consider using a two-by-four frame to set a floor on top of, but your kayaks really just need a strong frame to stay supported off the ground.
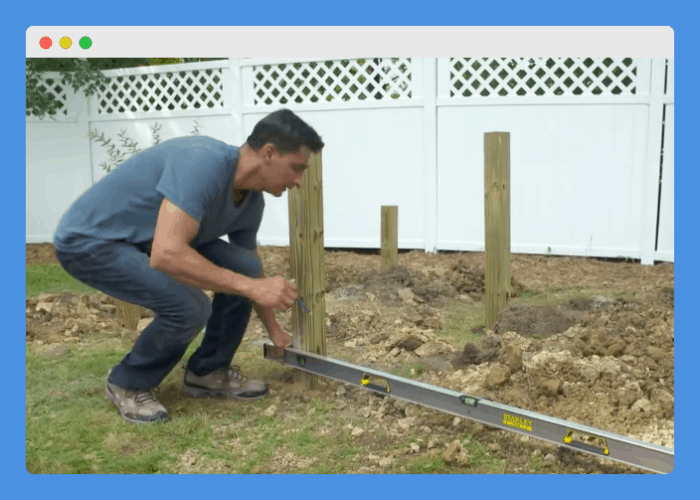
Vertical Posts
Let’s start with setting the vertical posts in place. You can use two-by-fours for vertical posts and set them on top of your concrete foundation blocks.
If you want to build a little sturdier shed, you might consider using four-by six pieces of lumber for the vertical posts. These posts can be attached to the concrete foundation blocks with metal brackets.
One challenge with the vertical posts of your shed is to keep them plumb.
Make sure that your vertical posts are tall enough to match the design dimensions of your shed. If you plan for a sloped roof on your shed, one set of vertical posts should be longer than the others.
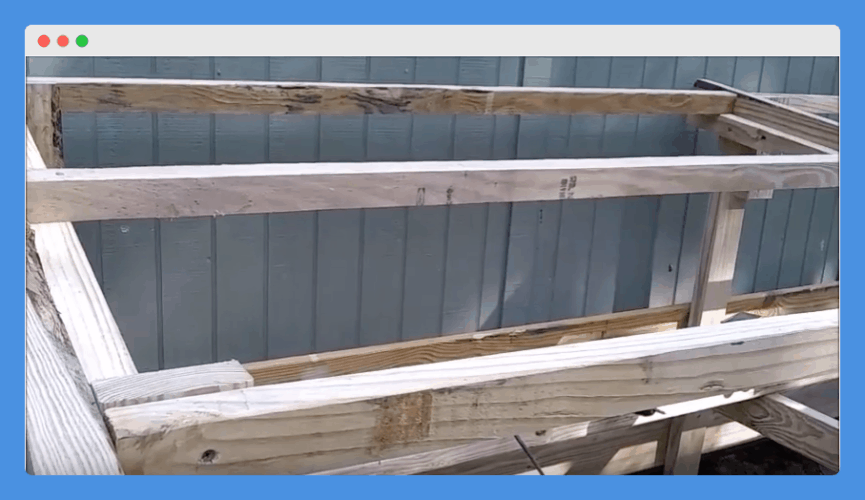
Going Horizontal
Once your vertical posts are in place, you can begin to connect them with horizontal two-by-fours. These will provide more structure and strength to your shed and eventually give your kayaks somewhere to sit.
Your horizontal supports should go between along both the length and width of your shed and you might install them at multiple heights, depending on the total height of your shed. Installing your horizontal supports at 12-18” height intervals is a good rule of thumb.
The Rack Installation
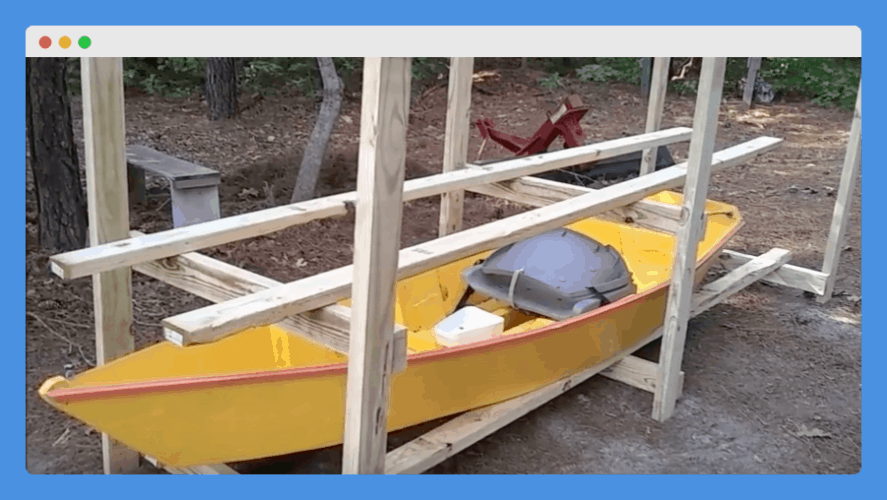
Once you have your basic frame in place, it’s time to consider where your kayaks will actually sit. If you choose wooden supports, these can simply just sit on top of the horizontal supports that run across the width of your rack.
Wooden two-by-fours will provide plenty of strength to store your kayaks either upside down or right side up. You’ll just want to add some type of fabric to the supports to protect your kayak(s) from damage.
If you design your shed to use prefabricated kayak storage racks, you’ll need to consider the loading/unloading method of using those racks. For wall-mounted racks, for example, you’ll need plenty of space above where you install the racks.
With wall-mounted racks, you’ll also need to plan out where you’ll install them on the interior wall(s) of your shed. This type of rack might also require you to frame the shed in entirely to provide extra structural support.
Installing The Roof
Now your shed is really coming together! After you’ve framed in the sides and installed the racks, it’s time to frame in the roof and install your chosen roofing material.
If you’re just building a small storage shed for a couple kayaks, it’s great to use a slanted roof design. This makes framing the roof much simpler as it will all be on one angle.
Use two-by-fours and install them along the width of your shed to provide the initial support for your roof. These two-by-fours should be bolted to the vertical posts of your shed.
Once you have the initial roof supports in place running the width of your shed, install more two-by-fours running along the length of your shed. These two-by-fours will eventually support your choice of waterproof roofing material.
The distance between the two-by-fours running along the length of your shed will depend on the total size of your shed. But if you want to avoid weak spots, make sure to install these supports at least every six inches across the total span of your shed’s roof.
After you have these supports in place, you can use plywood to finish the roof of your shed. If you choose to use sheet metal you can then install that on top of the plywood.
But if you’re cutting costs or you don’t live in an area that gets much snowfall in the winter, you can get away with skipping a step there. Save some money on plywood and install sheet metal right on top of the two-by-four supports that run the length of your shed.
Finishing Your Kayak Storage Shed
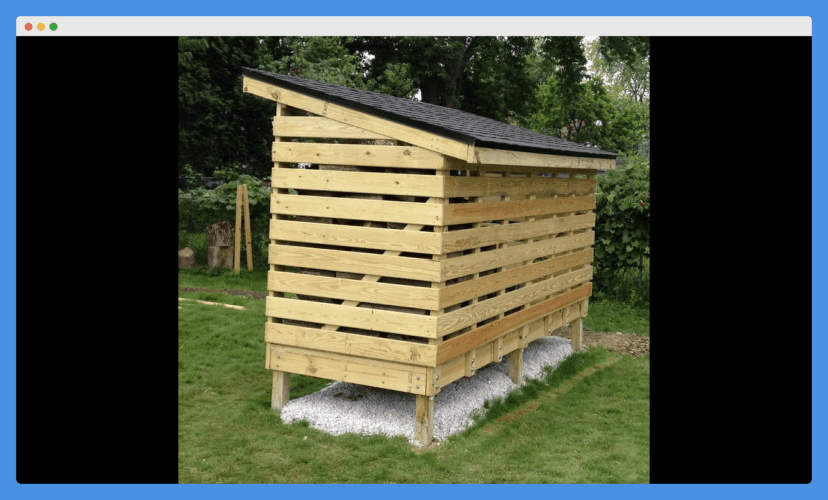
If you’ve taken the approach to build a shed entirely made of wood, your final touches will be installing the siding and adding a final layer of paint or stain.
You can leave a wooden shed unpainted, but adding even one layer of stain will further weatherproof your shed. This will make it last much longer and withstand the changing seasons in your area.
You can also choose to add a different material as the siding for your shed. The exact method for installing that siding will differ depending on your choice of plastic, resin, metal, or stainless steel siding.
As you install your preferred siding material, make sure to keep waterproofing in mind. Drilling holes through your siding gives water a place to leak in and impact your wooden beams, so be sure to use rubber washers for additional waterproofing.